Sunday, March 25, 2012

Space Nails!

When I saw my first set of space nails, I had a nerdgasm and said "OMG I HAVE TO DO THAT!".  Okay, well I said something like that or thought it....well, I may have actually said it out loud to myself.  Sometimes I don't realize I'm talking to myself so I can't be sure.

Honestly, I took this pic a while back before I started my blog but I really wanted to share it.  It looked so neat in the sun, you could see through the layers of color and it really looked like nebulae! I couldn't stop staring at them.

In addition to the black base, I used Claire's - Aqua, Sally Hansen -Twisted Pink and NYC - Taxi Yellow which I sponged on with a little piece of a make-up sponge.  Then I added a few small white dots with a dotting tool and little NYC - Starry Sliver glitter in the plain black areas to create, as the polish name indicates...STARS!  You can find some good tutorials on YouTube to see exactly how it's done.

Enjoy!


Sunday, March 18, 2012

Very Late St. Patrick's Mani

I should have posted this before work today but I got called in early so I skipped it!  I could have done it last night too but I was being SUPER lazy!  Oh well, it's here now!  I ended up doing two manis, one for Friday and one for Saturday.

On Friday, I wanted to do something fun and more artsy but it just seemed like too much work that day so I went with something easy.  I just piled 3 different gold glitters that I had onto this dark green.  I used a gold holo glitter top coat from Claire's first, Color Clubs Take the Stage over that, and then an un-named bigger chunkier gold glitter from Sally's.  The dark green also started out as one of those Sally's minis but I frankened it with a little Orly Winter Wonderland. 

So this was Friday's Mani...I couldn't seem to get a really good pic of it!

Wanted to see what it looked like mattified when I got home!  I <3 Matte glitter!
 This next one is what I wore on St. Patrick's Day.  I used a small dotting tool and an art brush for the shamrocks and stripes.  I need to get a good striping brush for more even lines.  Looks like it's time to go shopping YAY!  On this one I used an acrylic paint for the shamrocks and 2 polishes from The Icing.  I don't think they had names, there may have been names on the box they came in (it was a set of 3 Christmas minis) but there are no names on the bottle.  I hafta say something about the green polish...IT'S FREAKIN' AWESOME!  Indoors it just looks like a nice Kelly green jelly.  Outdoors it almost glows!  It turns into this neon green color. Remember Slimer from Ghostbusters?  That's exactly what it looks like!  Love it. Sorry, I'm rambling...I've had a couple beers!  Happy St. Patrick's Day!!!


Hope you all had a fun and safe holiday!

Wednesday, March 14, 2012

My Candy Shoppe Franken!

If I had waited, I could have bought the Claire's Candy Shoppe dupe but who knew they would come out with that?!  I sure didn't expect it!  Well, as soon as I saw swatches of Deborah Lippman's Candy Shoppe, I fell in love. I'm...frugal so it's hard for me to spend that much on a bottle of polish.  However, I had seen some peoples Candy Shoppe frankens and when I finally had a semi empty bottle to use, I set out to make my own!

I already had some pinks and Claire's Bedazzled so I went for it!  I ended up pouring a boat load of the Bedazzled into a little bit of top coat.  Looking back, I shouldn't have diluted it with anything but I didn't want to use the entire bottle and I was just experimenting.  Then I put just a little NYC Fuchsia Shock into the bottle and added a little more as I went along to get the color I wanted. It started out pretty well but it wasn't exactly what I wanted so I dumped a little bright pink glitter in added some Milani Gems and I'm pretty happy with the results! 

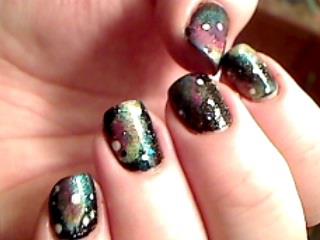
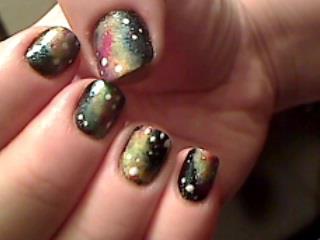
Here is what I came up with!


It has less glitter then the real stuff I think.  Could just be the number of coats I used, but with the pigment of the base, anymore then 2 coats and the glitter in the first coat doesn't show through very well.  I guess it's just a combo of less glitter and a heavier base color!

Overall, I do love this.  Even my boyfriend said it looked cool! I love getting validation on my nails from my boyfriend...He's such an enabler!

There's a Claire's literally right next to the store I work in so, honestly I will probably end up buying the Claire's dupe. I need another bottle of the Claire's Black Hole because it's a great one coat black.  If you haven't tried it, I highly recommend it! I know and love all the girls there so I'm sure they will convince me to buy a second polish...at 1/2 price, it doesn't take much work to sway me!

Friday, March 9, 2012

China Glaze Luxe and Lush with Bright Colors.

I haven't seen Luxe and Lush swatched over many light or bright colors but I thought it would be fun! It just takes on the color of the polish you use as your base and makes it look awesome with those iridescent pieces. (My pictures do not do it justice) I especially like  the way it looks over teal!  It gets a blue/green pink/purple color shift to it. 
The colors from thumb to pinky are Wet and Wild;  Wild Shine-Blazed, Hard Candy-Splendid, An unnamed Sally Girl polish from Sally's, Claire's-Grasshopper and NYC; Long Wearing-Fuchia Shock Creme


The Wet n' Wild-Blazed is kinda a bright apricot jelly.  I like it.

I can't decide which color to wear it over right now.   I'm kinda diggin' the different colored nails but I just don't know.  Maybe I'll go with just teal ...or yellow..the yellow looks cool in person. The Multi-color mani is pretty fun though!  Decisions, Decisions...

Wednesday, March 7, 2012

Pink Lemonade Water Marble

I think this is my second "successful" attempt at water marbling.  Well, okay I've tried more then twice but I usually get frustrated and quit after a while and go with a different mani. It made me think of pink lemonade, which is why I called it my Pink Lemonade Water Marble but I guess that was pretty obvious, right? It didn't turn out exactly as I had hoped but I'm still diggin' it.  I don't really try to go for a uniform look on every nail. That's mainly because I'm just not that good at it yet but  I also enjoy the different looks you can get out of the marbling so I love showing that off. Now that I'm lookign at them, my index fingers (2 of my favorite nails) came out matching each other pretty well!   I didn't intend for that but it works for me!
This is the left hand.

Aaand the left thumb. (Another one of my favorite nails)

Right hand. Personally I liked the left hand better!


And of course the right thumb!


I was actually wanting to go with blue, white and black but the polishes I had in those colors didn't want to spread very well. I ended up using Hard Candy-Splendid, Sally Hansen Hard as Nails-Dahlia and an unnamed white from the Icing. Those all spread out very well and didn't dry too fast.

I cleaned this up with disposable lip gloss applicators that I bought from Sally's. They are about 3.50 for a pack of 12 and really only work for one clean up each. Honestly for this clean up I think I used 3-4 but if it's just light clean up you could probably get away with just using one. Since they are angled it makes it easy to get right up against the cuticle. I like them more then the corrector pens myself. I never seemed to get much use out of each pen because the tips would always stain and transfer color onto my skin later. Just one of those little things that works for me!

Saturday, March 3, 2012

First Entry & Contest pictures!

Well, I've been thinking about doing this for a while...starting my own little nail blog I mean.  I finally decided to start one because Sarah from Chalkboard Nails is holding a nail art contest.  You can only use nail polish and dotting tools!  I thought it would be fun so here I am, hopefully not making an ass out of myself. Anyway, here it is; my entry for Sarah's contest!

It's Ernie and his rubber duckie together in the tubbie!

Please ignore my tore up index finger here!  Ajax + Bare hands = Ugliness

I <3 rubber duckies.

I used a small dotting tool, a toothpick and the end of a paintbrush as my dotting tools.

Hopefully these show up well for you.  I've been having issues with my monitor and have to set the brightness SUPER low so it doesn't go out on me.  Also, all I have to take pictures with at the moment is my webcam which makes it hard to get in a good position.  Oh well, I work with what I've got.  Enjoy!

Oh, just a side note I've also started remembering how much aggravation html can cause me!  I'm sure I'll get back into the swing of it though..we'll see.